How to Wing an Eddy Dog Sweater
As you may have seen on Instagram, my continuing fascination with the Prada Shell lead me to knit a sweater for Kay Gardiner’s dog Olive. It seemed a natural step in my Prada experiments, given how supportive Kay and Ann have been this year, allowing me to go on and on about short row shells as if it were the most natural thing knitter could do. But the sweater itself really began with my Vogue Knitting Live students in Chicago knitting their Prada Shell swatches when someone in the room (was it you, Corinne?) said that the class swatch we were making would be a great place to start a dog sweater. I was immediately ticked by the idea of Olive strutting in bespoke Prada across Central Park. And the project “Surprise Pawada* Sweater for Olive” was born.

who wore it best? Eddie or . . .

. . . Olive?
As I was working through it, virgin dog sweater knitter that I am, I was impressed by knitters who regularly knit for their pups. Dogs have funnel-shaped bodies and right angle head to neck relationships and four legs AND A TAIL all of which are in the wrong place as far as this knitter-for-humans is concerned. I needed a template.
I looked up sewing patterns on the internet to consider shapes, and squinted at various finished dog sweaters on Ravelry, all of which taught me that every dog is different from every other dog. Olive, being a combination breed, was of non-standard proportions. There wasn’t an existing pattern out there I could download and crib from. I would have to wing it.
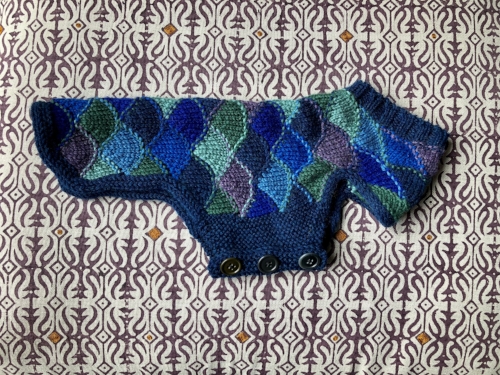
The best lesson I learned from my research is that all dogs sweaters are longer along the spine than along the belly . . . to avoid the pee parts. I could start there. Also, I assumed, avoiding the pee parts wouldn’t be a guarantee against, uh, dampness. So I chose Berroco Ultra Wool for washability (of course!), but also for the great palette that yarn comes in. I cast on for two 12 stitch foundation shells (see the Eddy Cowl for instructions) to begin what Ann Shayne would later call the “heinie flap”, increased to three shell widths from there, and worked five rows.

“Bottom up" construction
Once you read through the rest of what I did, you may understand why I decided not to attempt to write out the pattern. But understand that the shell technique is the same you will find in the Eddy Wrap and EddyHat&Cowl patterns. If you’re accustomed to knitting dog sweaters, this may help guide your way.
Next I had to figure out how many shells to use to circle Ms. Olive. I used the hinnie flap as a swatch and compared the shell dimensions to my target chest circumference of 14”. According to my gauge, I thought I should increase to five shells wide with room for error to be taken up by fewer or more rows in the garter stitch (read: stretchy) button band.

Olive in Fair Isle: lots of fitting clues here
How many around her neck, though? There was a puzzle. How do I transition between chest and neck; how do I bend sweater fabric around a corner from parallel-to-the-ground (in the body) to perpendicular-to-the-ground (in the neck) and leave an opening for her front legs? Should there be tiny sleeves? (see example sweater above) What about her nails? I would have to count on them being snag obstacles. I noted some Instagram dog knitters just knit cone-like shapes for their dog sweaters and trust the stretch factor of knit fabric to take up the slack, but there are always wrinkles in the modeled photos, and the shells in this pattern would buckle in an unflattering – and possibly worse – uncomfortable way. I would have to do some tailoring to guard against that. What followed was a lot a of experimentation, where I found out the shell does a lot of interesting things, but turning-a-tailored-corner was not one of them.

Chest bridge, construction
I decided, staring at the half-finished thing one day (I did a lot of this), to abandon the idea of any leg accommodation at all, and just go around them altogether, create a bridge across her chest using a non-standard foundation shell, then join to work in the round, building up additional height on her chest with fewer shells per row each row, while leaving off shells on her back so the piece would naturally curve over her chest.
I see a little silhouet-te of a doggo . . .
In the photo above, you can see if you look closely how the shells below the neck form partial rows. That’s as best as I can explain it. I tried annotating the photo but I lack the skills to make it look like anything but a mess. So once I finished building up the height in the chest section, I finished off with a simple 2 by 2 rib around the neck, and then made good on my edging plan and a pair of button bands.
Fiddly construction details (and pattern writing deal breakers) included my extensive use of provisional cast ons, knitted on i-cord, and a bunch of stitches picked up at non-provisional edges ruled by the stitch to row ratio. I chose 7 colors (like in the Eddy Wrap), and selected from my yarn basket for each shell on the fly. I borrowed one of the plushies from my youngest son’s collection to be my fit model; even though she isn’t as long as Olive, she matches her in other ways. I was worried about lengths more than anything, but I am relieved to say the final sweater fit well enough, and there is a good chance she will earn a few second looks on the sidewalks of New York this winter.

So I hope if you’re hell-bent on trying to make a Pawada Sweater, that this is something of a help. And if not, that this was at least an interesting document of how far I will go to meet a knit challenge.
*Pawada is Kay’s coinage. I wish I had thought of it, but I’m glad she did.